How to Customize Food Packaging: A Step-by-Step Guide for Restaurants & Food Brands
Custom Food Packaging Guide: 12-Step Process for Restaurants (2026)
Foodservice Packaging Guide
How to Customize Food Packaging: A Step-by-Step Guide for Restaurants & Food Brands
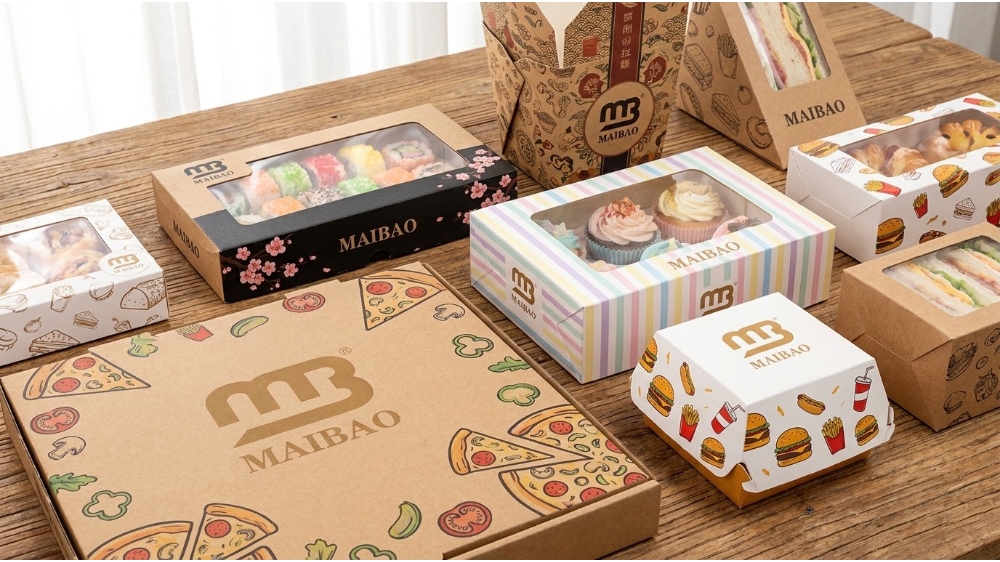
Custom packaging does more than hold food—it builds your brand, protects your product, and influences the customer experience from first glance to last bite. This guide walks you through the entire customization journey, from defining your food product to receiving finished boxes at your door.
Customizing food packaging is not a single decision—it is a sequence of interconnected choices. Every step, from the paper grade to the printing press to the finishing line, affects how your food looks, stays fresh, and arrives at your customer’s table. This guide breaks down the complete workflow into twelve actionable steps, with technical benchmarks, material comparisons, and production realities that most online guides overlook.
Whether you are a quick-service restaurant upgrading your fry boxes or a premium food brand launching a new product line, following a structured packaging development process eliminates guesswork, reduces costly mistakes, and ensures your packaging performs as well as it looks. The principles here apply to folding cartons, takeout containers, and custom-printed wraps—everything that carries your food to the world.
1. Define your food product
Before you choose a box style or a printing technique, document exactly what you are packaging. This goes beyond the menu description. Record the weight of a single portion, the temperature at which it is packed (hot, ambient, or chilled), the grease and moisture content, and the intended hold time from kitchen to customer. These four variables dictate every subsequent decision, from material stiffness to coating chemistry.
For example, a hot, grease-dense burger requires a box with a grease-resistant coating and structural rigidity to support the weight of the patty and toppings. A chilled salad box, on the other hand, needs a moisture barrier to prevent condensation from softening the paperboard. Industry food packaging guidelines consistently show that matching the packaging substrate to the food’s water activity (aw) and fat content reduces failure rates by over 40% compared to generic, one-size-fits-all boxes.
Also consider the packaging environment. Will the box sit under a heat lamp? Will it travel in a delivery bag with other hot items? Will it be refrigerated? These external conditions are as critical as the food itself. Document everything on a one-page product profile—it becomes your reference point for every supplier conversation that follows.
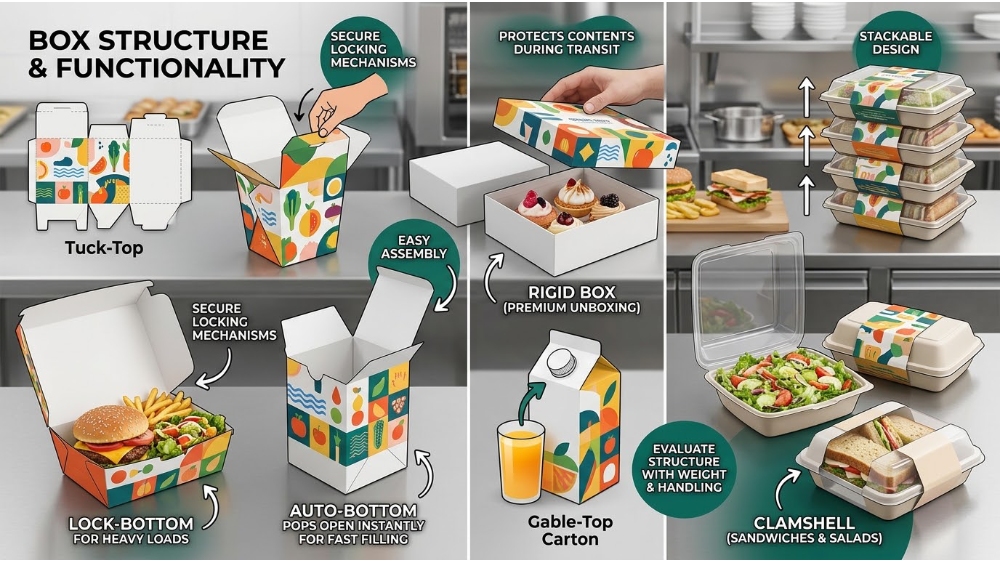
Box structure determines how your packaging opens, closes, stacks, and protects its contents. The most common structures for foodservice packaging include folding cartons (tuck-top, lock-bottom, and auto-bottom), rigid boxes (set-up boxes with separate lids), gable-top cartons (often used for liquids), and clamshells (hinged designs for sandwiches and salads).
For takeout and delivery, the folding carton is the workhorse. It ships flat, assembles quickly, and can be customized with a variety of locking mechanisms. The lock-bottom style offers superior strength for heavier items like full meal boxes, while the auto-bottom design is ideal for high-speed manual or automated filling. A well-chosen structure minimizes product movement during transit—directly reducing the risk of crushed food and customer complaints.
Structural design also affects the unboxing experience. A box that opens with a satisfying click or slides open smoothly adds perceived value. Conversely, a box that is difficult to open or collapses under the weight of its contents damages brand perception. Evaluate your structural choice with actual product weights and a realistic handling simulation before moving to material selection.
3. Select the paper material
The paperboard you choose affects stiffness, printability, grease resistance, and sustainability credentials. The four primary food-grade paperboards are SBS (Solid Bleached Sulphate), SUS (Solid Unbleached Sulphate), Kraft, and CCNB (Clay Coated Newsback). Each has distinct performance characteristics that align with different food types and brand aesthetics.
SBS is the premium choice—bright white, highly printable, and strong. It is the standard for high-end retail food packaging and dessert boxes. SUS offers a natural brown kraft appearance with excellent strength, often used for artisan or eco-focused brands. Kraft is the most breathable and lowest-cost option, but it absorbs grease readily unless coated. CCNB has a clay-coated white outer layer and a gray/brown back, providing good print quality at a lower cost—common for fast-food fry boxes and sandwich wedges.
Board thickness is measured in points (1/1000 inch) or GSM (grams per square meter). For a standard takeout box holding hot food, a thickness of 16–24 points (350–600 GSM) is typical. Lighter boards (below 14 points) are acceptable for small, dry items but fail structurally with grease or moisture. Always request a physical board sample from your supplier to feel the stiffness and surface finish before committing to a bulk order.
Material
Surface
Strength
Print quality
Best use
SBS (Solid Bleached Sulphate)
Bright white
High
Excellent
Premium retail, bakery, dessert boxes
SUS (Solid Unbleached Sulphate)
Natural kraft
Very high
Good
Artisan, eco-brand, heavy takeout
Kraft (uncoated)
Brown, porous
Moderate
Fair
Short-hold, low-grease items
CCNB (Clay Coated Newsback)
White top, gray back
Moderate
Good
Fast-food fry boxes, sandwich wedges
4. Select the correct coating
Coatings are functional layers applied to paperboard to modify its interaction with grease, moisture, and heat. The choice of coating directly determines whether your box survives a 25-minute delivery or disintegrates before it reaches the customer. The three most common food-safe coatings are PE (polyethylene), aqueous, and UV-cured coatings.
PE coating is a plastic-based barrier applied via extrusion. It offers the highest level of grease and moisture resistance, making it the default for hot, greasy foods like burgers, fried chicken, and loaded fries. PE-coated boards can withstand temperatures up to 200°F without softening. However, they are not fully compostable in standard facilities and can complicate recycling. Click to explore PE lined packaging for greasy foods
Aqueous coating is a water-based, repulpable alternative that provides good grease resistance and a printable surface. It is increasingly preferred by eco-conscious brands because it does not introduce plastic into the recycling stream. Aqueous coatings perform well for moderate hold times (10–20 minutes) and are compatible with offset and digital printing. For longer holds or high-grease applications, a higher-weight aqueous formulation or a dual-coating system (aqueous over PE) may be necessary.
UV coating is a high-gloss, ultra-durable finish cured with ultraviolet light. It is used primarily for visual impact rather than barrier performance. UV coatings add a premium feel and scuff resistance but are typically applied over already-barrier-coated boards. When specifying coatings, always request the manufacturer’s grease resistance rating (e.g., Kit test levels 1–12) and match it to your product’s actual grease and moisture profile.
5. Determine the correct size
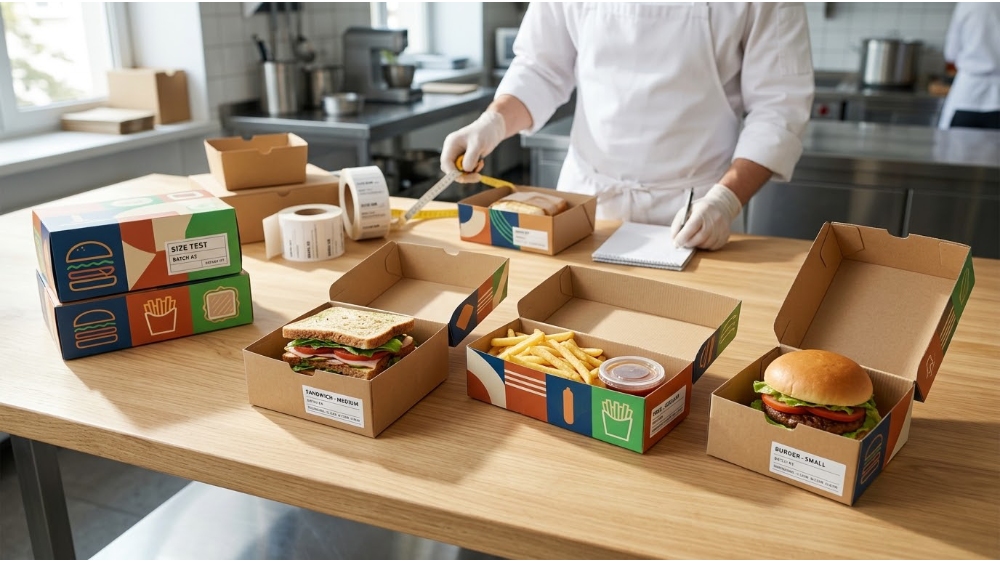
Size affects not only packaging cost but also product protection and customer perception. An oversized box allows food to shift during transit, leading to crushed items and mixed components. An undersized box compresses the food, potentially altering its texture and making it difficult for the customer to remove without tearing the packaging.
To determine the correct size, start with the product’s external dimensions—length, width, and height—when fully assembled or portioned. Add clearance allowances: typically 3–5mm on each side for easy loading and removal. For stacked items (e.g., multiple burgers or fries), account for total stack height plus the expected compression from stacking during delivery.
Also consider the packaging form factor. A square box may be more stable for sandwiches, while a rectangular box with a longer aspect ratio works better for fries or baguettes. Test your size with actual product samples and mock-up boxes. Adjust the dimensions until the food fits snugly with minimal movement but can still be removed cleanly. A well-sized box reduces the need for additional inserts or wrappers, lowering overall packaging costs and waste.
The printing method you select influences cost, color quality, and minimum order quantities. The three dominant technologies for food packaging are flexography, offset lithography, and digital printing. Each has strengths that match different production volumes and design complexities.
Flexography uses flexible rubber or photopolymer plates and fast-drying inks. It is the most cost-effective method for large volumes (MOQs starting at 10,000+ units) and is ideal for solid colors, spot colors, and simple line artwork. Flexo prints on a wide range of substrates, including uncoated kraft and PE-coated boards. However, flexo produces lower resolution compared to offset—typically 120–150 LPI (lines per inch)—so it is not the best choice for intricate gradients or photographic images.
Offset lithography offers the highest print quality, with resolutions up to 300 LPI. It is the standard for premium retail packaging where brand colors, photography, and fine typography must be reproduced with precision. Offset printing requires higher setup costs and plates, making it economical at quantities above 5,000–10,000 units. The process is compatible with SBS and aqueous-coated boards but less so with highly absorbent uncoated kraft.
Digital printing is the most flexible option for short runs and variable data. With no plate costs and fast turnaround, it is ideal for test batches, regional promotions, or products with frequent design updates. Digital print quality has improved significantly, now approaching offset levels on coated boards. However, the cost-per-unit remains higher than flexo and offset at scale. For runs below 2,000 units, digital is often the most economical and time-efficient choice.
Printing method quick reference:
Flexography — Best for: High volume, simple designs, uncoated substrates. MOQ: 10,000+
Digital printing — Best for: Short runs, test batches, variable data. MOQ: 500–2,000
7. Prepare your logo & artwork
Artwork preparation is where design meets manufacturing reality. The most common mistake is submitting RGB files or low-resolution images that look sharp on screen but print blurry. For packaging, all artwork must be supplied in CMYK color mode with a minimum resolution of 300 DPI at the final print size.
Work in vector format (AI, EPS, PDF) for logos, text, and geometric shapes. Vectors scale infinitely without loss of quality, ensuring sharp edges on every box. Raster images (photographs, textured backgrounds) should be imported at 300 DPI or higher. Include a 3–5mm bleed beyond the final cut line—this ensures that your design extends to the edge of the box after trimming, preventing unsightly white borders.
Equally important is the safe zone—the area inside the trim line where critical content (logo, text, UPC codes) must stay clear of folds and perforations. A typical safe zone is 5mm from the die line. Provide your packaging supplier with a properly constructed dieline (the 2D template of your box), and they can supply an artwork template that shows bleed, safe zones, and fold lines. Submitting artwork that matches the dieline from the outset eliminates costly proof revisions and production delays.
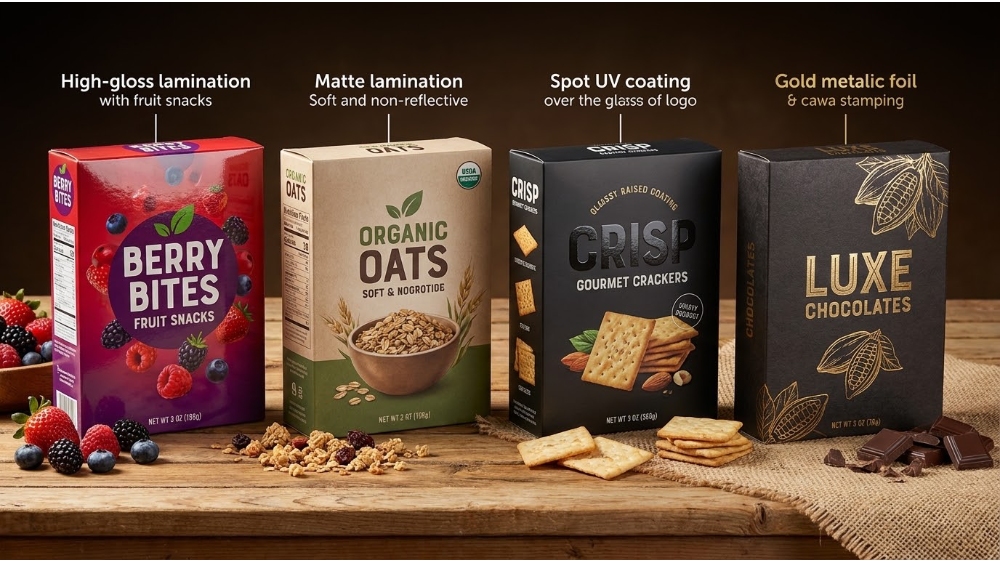
Finishing transforms a printed box into a tactile brand experience. While not every project requires finishing, the right enhancement can significantly increase perceived value. Common finishing options include lamination (gloss or matte), spot UV, embossing/debossing, and foil stamping.
Lamination applies a thin plastic film over the printed surface. Gloss lamination enhances color vibrancy and provides scuff resistance, making it popular for retail food displays. Matte lamination imparts a sophisticated, low-reflectivity finish that is favored by premium and organic food brands. Both add durability but reduce the board’s recyclability unless using biodegradable films.
Spot UV applies a high-gloss, transparent coating to specific areas of the design—typically the logo or product name—creating a striking contrast against a matte or uncoated background. It is a cost-effective way to achieve a premium effect without the cost of full lamination. Embossing raises a design element above the board surface, while foil stamping applies a metallic or pigmented film to create reflective accents. These tactile finishes appeal to unboxing enthusiasts and are commonly used in limited-edition or gift-oriented food packaging.
9. Order a physical sample
A digital proof on a screen is not a package. Color shifts occur between monitors and printed inks; structural issues only become apparent when a box is folded and filled. Ordering a physical sample—often called a prototype or production mock-up—is the most critical quality checkpoint in the entire customization process.
For a small fee, most reputable suppliers will produce one or two samples using the actual production substrate and the intended printing method (or a close approximation). Use these samples to test four things: color accuracy under different lighting conditions, structural integrity when filled with your product, ease of assembly, and customer unboxing experience. Fill the sample with actual food and hold it for the average delivery time. Only after passing this real-world test should you proceed to bulk production.
If the sample fails—perhaps the coating is insufficient or the locking mechanism is weak—revisions are still inexpensive at this stage. Make the necessary adjustments and request a revised sample. The cost of a few sample rounds is negligible compared to the cost of discarding thousands of flawed boxes. A single iteration with a well-prepared dieline and artwork often suffices for straightforward designs.
Before the presses run, you will receive a press proof—a printed sheet that represents the final colors, registration, and finishing effects on the actual production board. This is your last opportunity to catch errors in copy, color, or positioning. Compare the press proof against your original artwork and the physical sample. Check brand color consistency using a PANTONE reference or a color swatch.
During approval, verify all variable elements: product names, ingredient lists, net weight, barcodes, and any regulatory statements. Mistakes in these areas are expensive to correct after printing and can render your packaging unsellable. Sign a proof approval form that clearly states the proof number, date, and any specific color or structural notes. This document becomes the binding reference for production—any deviation from the approved proof is the supplier’s responsibility, while any uncommunicated change is yours.
Some suppliers offer a soft proof (PDF) and a hard proof (physical sheet). For critical projects, insist on a hard proof. It is the only way to evaluate coating adhesion, foil registration, and embossing depth with certainty. Once you sign off, the supplier proceeds to plate-making or press setup.
11. Understand minimum order quantity (MOQ)
MOQ is the smallest number of units a manufacturer will produce in a single production run. It is not an arbitrary number—it is driven by the economics of setup: plate-making (for offset/flexo), die-cutting tooling, and coating application. For flexographic printing, MOQs typically start at 10,000–20,000 units; for offset, 5,000–10,000; for digital, MOQs can be as low as 500–1,000.
When evaluating MOQ, consider your inventory carrying capacity, your monthly sales velocity, and your forecast accuracy. Ordering above your immediate needs can reduce the per-unit cost but increases warehousing costs and the risk of obsolescence (if you update your packaging design later). Conversely, ordering too close to your MOQ may result in a high per-unit price that erodes margins.
For startups or small-batch products, work with suppliers who offer low-MOX programs or digital-first production to test the market with minimal risk. Once demand stabilizes, transition to higher-volume flexo or offset runs to lower unit costs. Also ask about split runs—some suppliers allow you to split a single production run across multiple designs (e.g., two SKUs) to reach the MOQ for each while sharing setup costs.
MOQ and lead time trade-offs:
Low MOQ (500–2,000) → Higher unit cost, shorter lead time (digital)
Mid MOQ (5,000–10,000) → Balanced cost, standard lead time (offset)
High MOQ (20,000+) → Lowest unit cost, longer lead time (flexo)
12. Production & shipping timeline
Lead time is the period between proof approval and finished goods arriving at your door. It consists of plate-making (3–5 days for flexo/offset), print and coating (5–10 days), die-cutting and finishing (3–7 days), and shipping (depending on origin and destination). Total lead time typically ranges from 4 to 8 weeks for sea freight and 2 to 3 weeks for air freight from overseas suppliers.
For domestic or regional suppliers, lead times are often shorter—1–3 weeks—but per-unit costs are correspondingly higher. Factor in customs clearance and warehouse receiving when planning your inventory. A common best practice is to maintain a safety stock of 4–6 weeks of current packaging while the custom order is in production, preventing any interruption in your operations.
Communicate your required delivery date to your supplier during the quoting phase—this allows them to reserve production slots and recommend the most appropriate shipping method. Expedited production (rush fees) can shorten lead times but often adds 15–30% to the cost. For seasonal or promotional packaging, plan at least 10–12 weeks ahead to avoid the year-end manufacturing rush that slows down every supplier globally.
Ready to bring your custom food packaging to life?
From concept to delivery, get packaging that performs as hard as your food does. Share your product requirements and let’s build the perfect box together.
What is the first step in customizing food packaging?
The first step is to define your food product—record its weight, temperature, grease level, and intended hold time. This data drives every subsequent choice, from material to coating to structure.
How long does the full customization process take from start to finish?
Total timeline ranges from 4 to 8 weeks for overseas production and shipping, or 1 to 3 weeks for domestic suppliers. Always add a 2-week buffer for sampling and proof revisions.
What is the minimum order quantity (MOQ) for custom-printed boxes?
MOQ depends on the printing method: digital starts at 500–1,000 units, offset at 5,000–10,000, and flexo at 10,000+. Digital is the best entry point for low-volume tests.
Can I order a sample before placing a bulk order?
Yes—reputable suppliers offer physical samples or prototypes for a nominal fee. Always test the sample with your actual product under real-world conditions before approving bulk production.
Post time:
Aug-18-2026
For inquiries about our products or pricelist, please leave your email to us and we will be in touch within 24 hours.