How Are Paper Cups Made? 8 Steps from Paperboard to Finished Cups
Paper Cup Manufacturing Process: 8 Steps from Paperboard to Final Product
Paper Cup Manufacturing Guide
How Are Paper Cups Made? 8 Steps from Paperboard to Finished Cups
From raw paperboard to a leak‑proof cup that holds your morning coffee — the journey involves precision coating, high‑speed forming, and multiple quality checkpoints. Here’s the step‑by‑step engineering behind every disposable paper cup.
A paper cup begins as a roll of paperboard and ends as a precisely formed, coated container that must hold liquid without leaking, survive thermal stress, and feel comfortable to hold. The manufacturing process is a blend of material science, mechanical engineering, and high‑speed automation — typically producing 80‑120 cups per minute on a single forming machine.
This guide breaks down each of the eight essential steps, from raw material selection to the final quality check, explaining not just what happens but why it matters for cup performance, durability, and recyclability.
1. Paperboard selection — the foundation of strength
Every paper cup starts with a specific grade of paperboard, typically a solid bleached sulfate (SBS) or unbleached kraft board. The board must have a high stiffness‑to‑weight ratio to support the beverage weight without buckling, yet be thin enough to form smoothly. Most cup manufacturers use paperboard with a basis weight between 180 and 350 gsm (grams per square meter), depending on the cup size and application — hot cups generally use heavier board for insulation, while cold cups can be lighter.
Critical material properties include bending stiffness, surface smoothness, and moisture content. According to a 2024 study published in BioResources, the coefficient of friction and the board’s internal bond strength directly affect runnability on high‑speed forming machines, influencing defect rates such as split seams and uneven rims. Manufacturers also consider fiber orientation, since the board’s grain direction impacts how easily it curls and seals.
For hot beverages, the board must withstand temperatures up to 90°C without deforming, which is why many hot‑cup boards incorporate a layer of insulation (often a slight corrugation or air‑pocket structure) in addition to the coating. Cold cups prioritise condensation resistance and printability.
2. Coating — extrusion lamination of PE or PLA
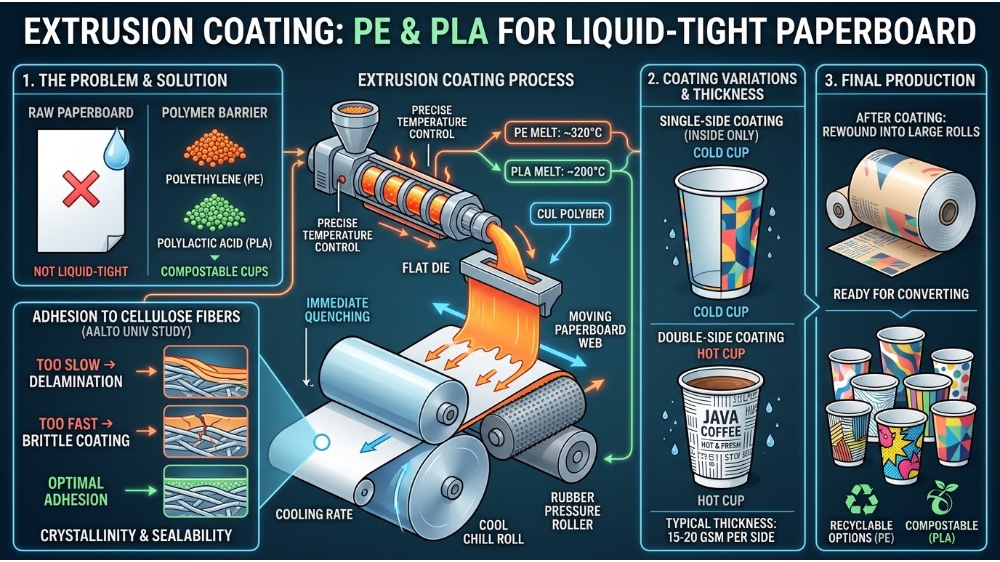
Raw paperboard is not liquid‑tight; it must be coated with a thermoplastic polymer to form a moisture barrier. The dominant method is extrusion coating: molten polyethylene (PE) — or, increasingly, polylactic acid (PLA) for compostable cups — is extruded through a flat die and pressed onto the moving paperboard web between a cooled chill roll and a rubber pressure roller. The coating thickness typically ranges from 15 to 20 gsm per side, though single‑side coating (the inside only) is common for cold cups, while hot cups often receive a double‑side coating to resist both liquid and external condensation.
The extrusion process requires precise temperature control — PE is melted at around 320°C — and immediate quenching to set the film’s crystallinity, which affects sealability. A 2023 thesis from Aalto University detailed how the cooling rate influences the polymer’s adhesion to the cellulose fibers; too slow, and the coating delaminates; too fast, and it becomes brittle.
For PLA coatings, the extrusion temperature is lower (about 200°C), and the material requires different chill‑roll temperatures to maintain its heat‑seal properties. After coating, the paperboard is rewound into large rolls, ready for converting.
3. Printing and branding — flexography and gravure
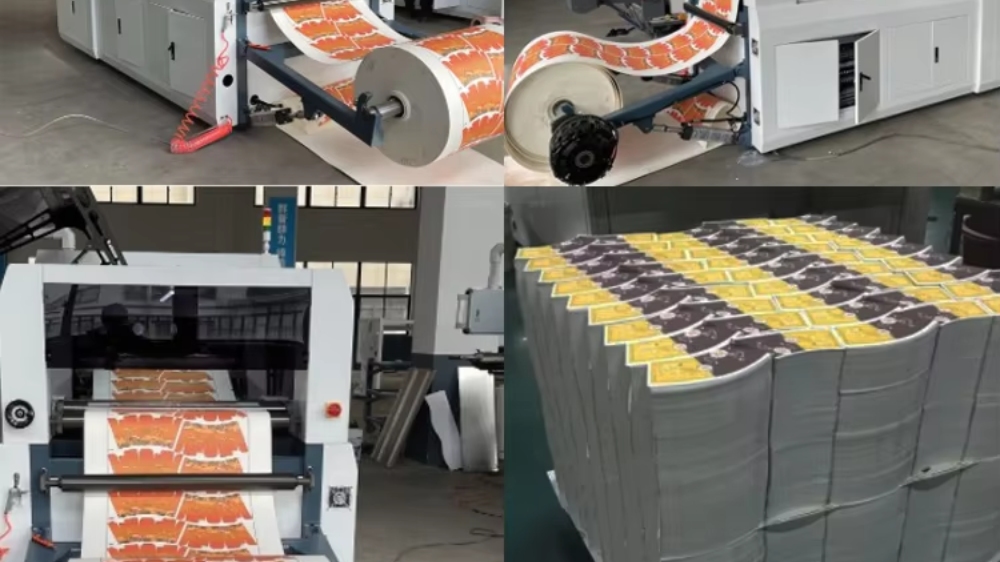
Most paper cups carry custom branding, nutritional information, or promotional artwork. The printing is applied before the cup is formed, on the flat, coated paperboard web. The industry standard is flexographic printing using water‑based inks, which offer good adhesion to the coated surface and comply with food‑contact regulations. For higher‑resolution graphics, gravure printing is used for long runs.
Printing registration is critical because the artwork must align perfectly with the final cup’s seam and bottom. Modern printing lines include inline corona treatment to increase surface energy, ensuring ink adhesion to the polyethylene or PLA layer. After printing, the web passes through hot‑air dryers to cure the ink before rewinding for die‑cutting.
Some manufacturers apply a protective over‑varnish to prevent scuffing during cup forming and filling, but this adds cost and can affect recyclability. The choice of ink and coating must be carefully matched to the intended cup use — hot liquids can cause ink migration if the system is not certified for direct food contact.
4. Die‑cutting — shaping the flat blank
The printed, coated paperboard is fed into a die‑cutting press that punches out the cup sidewall blank — a flat, fan‑shaped piece that will later be wrapped into a conical or cylindrical form. The blank’s geometry determines the cup’s final top and bottom diameters, as well as the seam overlap. A typical sidewall blank has a curved top edge (for the rim) and a straight bottom edge (for the bottom seal), with a small tab at one end for the seam overlap.
Die‑cutting is performed with high‑precision steel‑rule dies, capable of cutting stacks of board at speeds exceeding 200 strokes per minute. The cutting pressure must be finely tuned to avoid crushing the board’s fibers, which would weaken the cup. According to industry data from Papacko, the seam overlap is usually 3–5 mm, and the cut tolerance is held within ±0.2 mm to ensure consistent cup geometry.
At the same time, the die may also perforate the bottom disc (the cup’s base) from a separate roll of coated board, often with a slightly different thickness to provide additional rigidity.
5. Cup forming — from flat blank to 3D shell
The forming machine (typically a rotary or in‑line system) takes the die‑cut sidewall blank and wraps it around a heated mandrel. The blank is guided into a cylindrical or conical shape, with the overlap edges brought together. This step is purely mechanical — no adhesive is used yet; the cup holds its shape by tension and the stiffness of the board.
High‑speed cup machines, such as those from Paper Machinery Corporation or HORAUF, operate at cycles of 80 to 120 cups per minute. The mandrel’s temperature is carefully controlled (around 150°C) to preheat the board, which softens the coating and prepares it for sealing. The bottom disc is simultaneously inserted into the lower part of the formed shell, ready for the bottom‑sealing station.
Forming precision is critical: any misalignment will result in a crooked cup or a seam that cannot be properly sealed. Automatic optical sensors detect and reject misfed blanks before they reach the sealing stage.
6. Side seam sealing — heat, pressure, and dwell time
The side seam is formed by overlapping the two edges of the blank — typically a 3‑5 mm wide strip — and applying heat and pressure to melt the polyethylene coating on both layers, fusing them together. This is the cup’s primary structural seal; it must be strong enough to withstand the internal pressure of a filled cup and the mechanical stress of handling.
The sealing station consists of a heated bar or wheel that presses the overlap against the mandrel for a specific dwell time (usually fractions of a second). The key parameters are temperature (typically 180‑220°C for PE), pressure (2‑4 bar), and dwell time (0.3‑0.6 seconds). Too little heat leads to a weak seal; too much heat can burn the board or cause the coating to squeeze out, creating a sticky edge. Studies from LUT University have shown that the seam peel strength correlates directly with the coating’s melt flow index and the application of uniform pressure.
After sealing, the seam is rapidly cooled to set the polymer bond. Some machines also apply an additional ultrasonic sealing step for extra reliability, especially on large‑diameter cups.
7. Bottom sealing — the critical leak‑proof bond
The cup bottom is a separate circular disc of coated paperboard, pre‑cut and positioned inside the formed cup shell. The bottom seal is created by a combination of heat and mechanical curling: the cup is moved to a bottom‑sealing station where the lower edge of the sidewall is folded inward over the bottom disc, and a heated pressure ring fuses the two layers together. This creates a tight, leak‑proof seal that must withstand the weight of the liquid as well as any shaking during transport.
The bottom‑sealing process is the most failure‑sensitive step in paper cup manufacturing. Incomplete sealing or uneven pressure leads to pinhole leaks, which are the #1 customer complaint. To prevent this, modern machines use servo‑controlled heating elements and real‑time pressure monitoring. The seal area is typically 5‑8 mm wide, and the coating must be uniformly melted to form a continuous polymer film. According to Hotpack Global, bottom seal failures account for over 70% of defective cups, making this the most quality‑controlled station.
After bottom sealing, the cup is cooled to set the bond, and any excess material is trimmed.
Seal type
Temperature (°C)
Pressure (bar)
Dwell (s)
Common defects
Side seam (overlap)
180–220
2–4
0.3–0.6
Delamination, scorching
Bottom seal (curled)
200–240
3–5
0.5–0.8
Pinholes, uneven fold
Rim curl (optional)
150–180
1–2
0.2–0.4
Split rims, incomplete curl
8. Rim curling and final inspection
The top rim of the cup is curled outward and downward into a smooth, rounded lip. This serves three purposes: it provides a comfortable drinking surface, adds structural rigidity to the top edge (preventing collapse), and creates a better fit for lidding. The curling is done by a heated forming tool that rolls the edge over a mandrel, again using the thermoplastic coating as a bonding agent to hold the curl in place.
Rim curl quality is vital for lid sealing — an uneven curl will cause leaks around the lid. After curling, the cup passes through an automated inspection station that checks for:
Seam integrity (pressure test)
Bottom seal leak (vacuum or air‑pressure test)
Dimensional accuracy (height and diameter)
Print alignment and surface defects
Defective cups are rejected and recycled into the paperboard stream where possible. Acceptable cups are stacked, counted, and packed into sleeves or bags for shipment. A typical cup machine can produce up to 150 million cups per year per line, making quality assurance at this final stage critical to minimising waste.
Some high‑end operations also perform random destructive testing — e.g., filling cups with hot water and measuring leak rates after 30 minutes — to validate the production batch.
How Is the Plastic Lining Applied to Paper Cups?
As detailed in Step 2, the plastic lining is applied via extrusion coating — molten polymer is spread onto the moving paperboard and immediately cooled to form a thin, uniform film. This lining is what makes the cup liquid‑tight and provides the heat‑sealable surface for seams and bottom. The same principle applies to both PE and PLA coatings, though the extrusion temperature and cooling profile differ.
For a deeper look into why different coatings are chosen and how they affect recyclability and compostability, see our separate guide on Paper Cup Coatings Explained — which covers the trade‑offs between PE, PLA, water‑based, and biodegradable barrier options.
From board to cup — a process built on control
Each of the eight steps we’ve covered relies on precise control of temperature, pressure, speed, and material properties. A well‑made paper cup is the result of decades of engineering refinement — from the extrusion die that lays down a 20‑micron coating to the servo‑driven curling head that ensures a smooth lip every time.
For businesses sourcing custom paper cups, understanding these steps helps you ask the right questions: What paperboard weight works for my beverage? Is single‑side or double‑side coating more suitable? How can I ensure my artwork stays sharp through the forming process? Partnering with a manufacturer that controls each stage — from raw material to final inspection — guarantees consistent quality across millions of cups.
Whether you need hot cups, cold cups, or fully compostable PLA‑lined options, the fundamental manufacturing science remains the same. The difference lies in the materials and the meticulous attention to each of these eight steps.
Frequently Asked Questions
What materials are used to make paper cups?
Paper cups are made from food‑grade paperboard (usually SBS or kraft) coated with a thin layer of polyethylene (PE) or polylactic acid (PLA). The coating provides liquid barrier and heat‑sealability, while the board gives structural strength.
Are paper cups with plastic lining recyclable?
It depends on local recycling facilities. Traditional PE‑lined cups are generally not recyclable in standard paper streams because the plastic layer must be separated. However, PLA‑lined cups are compostable in industrial facilities, and some regions now accept them in organics streams.
Why do paper cups have a curled rim?
The curled rim adds stiffness to the top edge, prevents the cup from collapsing, provides a comfortable drinking surface, and improves the seal with a lid. It also reduces the risk of the edge splitting under stress.
How fast are paper cups manufactured?
Modern cup‑forming machines operate at 80–120 cups per minute, with some high‑speed lines reaching 150 cups per minute. A single production line can produce over 100 million cups annually.
Need custom paper cups with consistent quality?
From material selection to final forming, Maibao Packaging offers one‑stop manufacturing solutions tailored to your beverage brand. Talk to our packaging specialists to match cup design, coating, and printing to your exact specifications.